Installing .NET 6 on a Raspberry PI (Debian)

Create a folder, for example /app/dotnet6, and assign ownership to the right user:

sudo mkdir /app/dotnet6
sudo chown -R pi /app/

Download the .NET 6 SDK at Microsoft:

wget https://download.visualstudio.microsoft.com/download/pr/adcd9310-5072-4179-9b8b-16563b897995/15a7595966f488c74909e4a9273c0e24/dotnet-sdk-6.0.100-linux-arm64.tar.gz

Extract the tar.gz file in the /app/dotnet6 directory:

sudo tar zxf dotnet-sdk-6.0.100-linux-arm64.tar.gz -C /app/dotnet6

Test the .NET6 installation by browsing to the installation directory and execute the dotnet –info command:

cd /app/dotnet6
./dotnet --info
.NET SDK (reflecting any global.json):
 Version:   5.0.101
 Commit:    d05174dc5a

Runtime Environment:
 OS Name:     debian
 OS Version:  10
 OS Platform: Linux
 RID:         debian.10-arm64
 Base Path:   /app/dotnet/sdk/5.0.101/

Host (useful for support):
  Version: 5.0.1
  Commit:  b02e13abab

.NET SDKs installed:
  5.0.101 [/app/dotnet/sdk]

.NET runtimes installed:
  Microsoft.AspNetCore.App 5.0.1 [/app/dotnet/shared/Microsoft.AspNetCore.App]
  Microsoft.NETCore.App 5.0.1 [/app/dotnet/shared/Microsoft.NETCore.App]

To install additional .NET runtimes or SDKs:
  https://aka.ms/dotnet-download

Increasing the maximum upload file size in WordPress

Locate php.ini. For Debian this file is located in:

/etc/php/7.4/apache2

Search for the following configuration lines (in nano use CTRL+W for search) and replace the existing configuration values with acceptable values.

max_execution_time = 60
memory_limit = 128M
post_max_size = 64M
upload_max_filesize = 64M
max_input_time = 60
file_uploads = On
safe_mode = Off

Locate .htaccess file in the root of your wordpress directory and add or adjust:

php_value upload_max_filesize 64M
php_value post_max_size 128M
php_value memory_limit 256M
php_value max_execution_time 300
php_value max_input_time 300

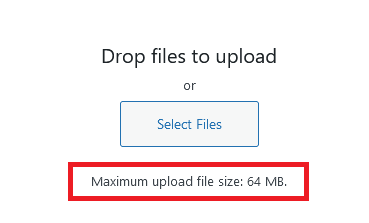
When you open the media library in WordPress and try to upload a file it should reflect the maximum configured upload file size:

InfluxDB update from 1.8.6-1 to 1.8.7-1

Upgrading InfluxDB failed. For some reason the update caused permission issues with the start-up script:

usr/lib/influxdb/scripts/influxd-systemd-start.sh

When I gave this file permission to execute the InfluxDB service started again:

chmod +x /usr/lib/influxdb/scripts/influxd-systemd-start.sh

Then, the next problem appeared: systemctl didn’t recognise that the service was actually running: it was stuck in the state “activating”. Then I found an article on serverfault that described my problem.

I’m running InfluxDB on Debian so couldn’t apply the suggestion solution, but needed to interpret this a bit. I edited the file:

/etc/systemd/system/influxd.service

I changed the type to simple, as indicated in this code sample:

[Unit]
Description=InfluxDB is an open-source, distributed, time series database
Documentation=https://docs.influxdata.com/influxdb/
After=network-online.target

[Service]
User=influxdb
Group=influxdb
LimitNOFILE=65536
EnvironmentFile=-/etc/default/influxdb
ExecStart=/usr/lib/influxdb/scripts/influxd-systemd-start.sh
KillMode=control-group
Restart=on-failure
Type=simple
PIDFile=/var/lib/influxdb/influxd.pid

[Install]
WantedBy=multi-user.target
Alias=influxd.service

Check the disk space consumption of a Linux directory

Today, one of my virtual systems ran out of disk space. To find the root cause I needed to find the directory that was filling up. Using the right parameters, the du command returns a list of directories and their disk space consumption.

du -hc --max-depth=0 /var

For example:

root@DB152:/# du -hc --max-depth 1 /var
704K    /var/tmp
4.0K    /var/mail
23M     /var/log
1.1M    /var/backups
4.0K    /var/local
3.2G    /var/lib
20K     /var/spool
734M    /var/cache
4.0K    /var/opt
3.9G    /var
3.9G    total

Removing files of a certain type recursively:

find . -name "*json.log" -type f -delete

Clearing (system) log files:

truncate /var/log/* --size 0

Automatically push .NET libraries on NuGet

Getting the source code of my home automation project on Github was a first step. Now, I’m ready to post some components on NuGet as well. This makes it easier to manage the packages and reduces the dependencies between my Visual Studio projects.

I ran into a challenge though: how could I easily upload my projects to NuGet without having to use the command line? Luckily, Visual Studio has something called Post-build event command line.

Post-build event command line; you can find this in the properties / build events tab of your project.

The command put into this block is executed after finishing the build. The only thing you need to do manually is change the package version, otherwise NuGet will rightfully decline the push (the version already exists).

You need to manually update the package version for NuGet to accept the push.

Depending on your directory and project structure you should be able to get the command below up and running. You can easily test this in the Command Prompt, just make sure you browse to the right target directory.

cd bin\Debug && dotnet nuget push *.nupkg -k xxx -s https://api.nuget.org/v3/index.json --skip-duplicate

Of course, you should replace the xxx with the NuGet API key.

Reduce disk space consumption in Windows 10

Windows 10 can be quite hungry when it comes to disk space, especially when the system has been used for several years and has been updated several times. In some situations temporary update files are “stuck” in the C:\Windows\WinSXS directory, which at that time can consume up to 17Gb of disk space. Microsoft has published an article describing the process to clean up this directory in more detail. However, this doesn’t always work as described.

I recommend you to do the following:

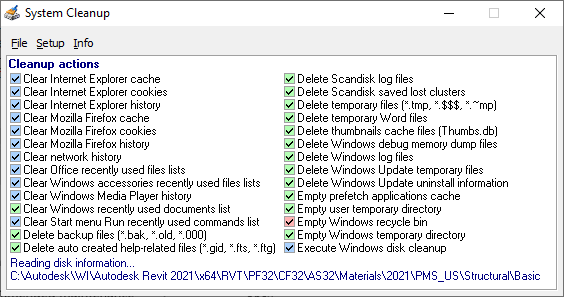
  1. Download the latest version of System Cleanup, an old but ad-free program that scans the system for temporary files.
  2. Run the Disk Clean-up (as administrator!) and clean-up the system.
  3. Use Dism, the command line deployment tool, the merge existing update images into the current installation using the commands below. This might take several hours to complete. You might need to repeat them once or twice to take effect.
Dism.exe /online /Cleanup-Image /StartComponentCleanup /ResetBase
Dism /Online /Cleanup-Image /RestoreHealth
Running System Cleanup, an old but ad-free tool that scans the system for temporary files.
Starting Disk Clean-up as administrator. Make sure you tick all necessary boxes for clean up.

These steps helps helped me to free up roughly 12Gb of storage space on a small little tables that only had a 32Gb drive. Its users can now enjoy using it again for the occasional e-mail and card game, without worrying about a lack of disk space and, as a result, missing important security updates.

Publishing an existing .NET (Core) project to Github

I started working on my home automation project in 2020. I started with a simple backup script that copies the source code to a second hard drive, just in case the primary hard drive fails. When my code base started to grow I extended the script to create a (daily) second copy on OneDrive. From a backup perspective this is working fine, but it does not give me versioning and source control. Luckily, Github exists. Microsoft developed a Github extension for Visual Studio.

Make sure you update your Visual Studio installation before you install the extension. You also need to install Git for Windows. Additionally you need a Github account. After that, publishing an existing project to Github is pretty straightforward.

Open the command line and browse to the directory of the project. Execute a git init.

D:\>cd DataMario\Ontwikkeling\IoT\Verhaeg.IoT.Geofencing.Sensor

D:\DataMario\Ontwikkeling\IoT\Verhaeg.IoT.Geofencing.Sensor>git init
Initialized empty Git repository in D:/DataMario/Ontwikkeling/IoT/Verhaeg.IoT.Geofencing.Sensor/.git/

D:\DataMario\Ontwikkeling\IoT\Verhaeg.IoT.Geofencing.Sensor>

Open Visual Studio and copy/paste an existing gitignore file to exclude configuration files that could include passwords.

Then push the project to Git:

Push the project to Git service…

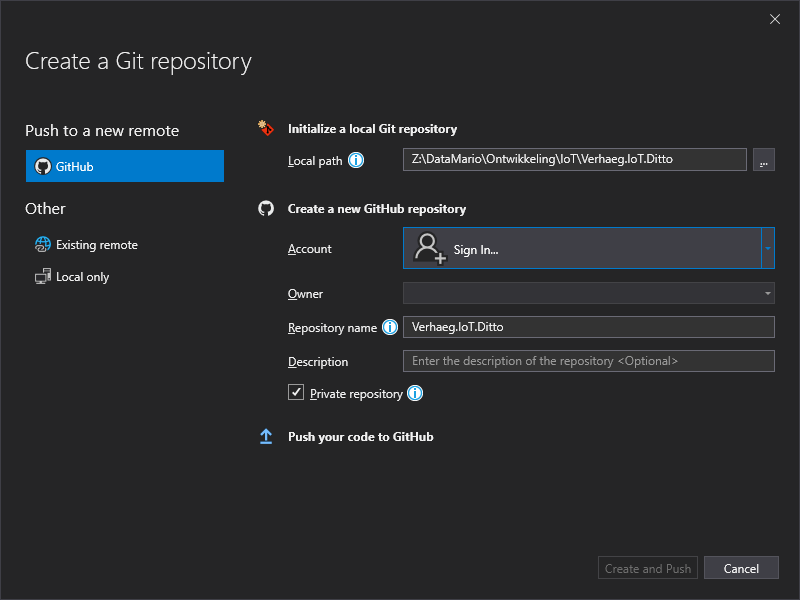
And finally, define the Git repository details.

Visual studio will offer you to create a Github repository.

Once you have published the project on Github you need to maintain it. There are three steps required to upload changes to the Github repository:

  1. Pull: pulls the latest version of the repository to the local development machine.
  2. Commit: commits the code changes to a “snapshot” of your project.
  3. Push: pushes the latest snapshot of your project to the repository.