Make Proxmox VLAN aware

I’m using Proxmox as a hypervisor to run my virtual machines and use two VLANs in my home network: one for normal traffic and one separate VLAN for IoT traffic. Virtual machines should be connected to one of those networks. The normal network is typically untagged (vlan ID 20) while the IoT traffic is tagged with VLAN 21.

Configuration file: /etc/network/interfaces

auto lo
iface lo inet loopback

iface eno1 inet manual

auto vmbr0
iface vmbr0 inet manual
        bridge-ports eno1
        bridge-stp off
        bridge-fd 0
        bridge-vlan-aware yes
        bridge-vids 2-4094

auto vmbr0.20
iface vmbr0.20 inet static
        address 192.168.20.x/24
        gateway 192.168.20.1

This should result in the following Proxmox network configuration:

Proxmox host system network configuration

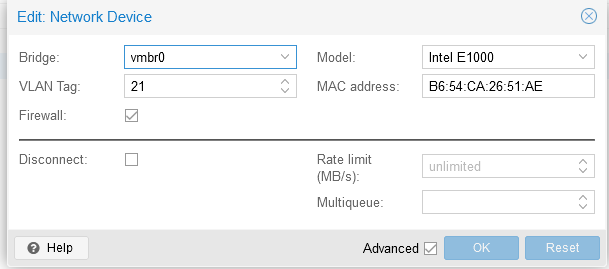
Now you can easily add a network adapter to a virtual machine and tag it with the correct VLAN.

Virtual machine network adapter configuration, including tagged VLAN.

Install Telegraf for monitoring purposes

curl -fsSL https://repos.influxdata.com/influxdata-archive_compat.key -o /etc/apt/keyrings/influxdata-archive_compat.key
echo "deb [signed-by=/etc/apt/keyrings/influxdata-archive_compat.key] https://repos.influxdata.com/debian stable main" | tee /etc/apt/sources.list.d/influxdata.list
apt update
apt -y install telegraf 

The telegraf configuration is located in /etc/telegraf/

Example configuration:

[global_tags]
[agent]
  interval = "60s"
  round_interval = true
  metric_batch_size = 1000
  metric_buffer_limit = 10000
  collection_jitter = "0s"
  flush_interval = "10s"
  flush_jitter = "0s"
  precision = ""
  hostname = "DB152"
  omit_hostname = false
[[outputs.influxdb]]
  urls = ["https://192.168.21.152:8086"]
  database = "Verhaeg_Monitoring"
  username = "xxx"
  password = "xxx"
  insecure_skip_verify = true
[[inputs.cpu]]
  percpu = true
  totalcpu = true
  collect_cpu_time = false
  report_active = false
[[inputs.disk]]
  ignore_fs = ["tmpfs", "devtmpfs", "devfs", "iso9660", "overlay", "aufs", "squashfs"]
[[inputs.mem]]
[[inputs.swap]]
[[inputs.net]]
  interfaces = ["ens18"]
[[inputs.netstat]]
[[inputs.kernel]]
[[inputs.system]]
[[inputs.processes]]
[[inputs.diskio]]

Installing Eclipse Ditto

Download Ditto from Github and unzip it in your favorite directory:

cd /data/install
wget https://github.com/eclipse/ditto/archive/master.zip
unzip master.zip

Adjust the nginx password:

openssl passwd -quiet
 Password: <enter password>
 Verifying - Password: <enter password>

Append the printed hash in the nginx.httpasswd (in the same folder as docker-compose.yml) file placing the username who shall receive this password in front like this:

ditto:A6BgmB8IEtPTs

Configure the docker data directory in /etc/docker/deamon.json:

{
   "data-root": "/data/docker"
}

And finally, install Ditto using the Docker compose script:

cd ditto-master/deployment/docker/
docker-compose up -d

To automatically start Ditto at system start, and clean up the related log-files and the following two lines to crontab:

crontab -e

@reboot sleep 30 && cd /data/docker && find . -name "*json.log" -type f -delete
@reboot sleep 60 && cd /data/install/ditto-master/deployment/docker && sudo docker-compose up -d

Done!

Updating Eclipse Ditto

First, kill all docker containers. Then remove them, and remove their related images:

docker kill $(docker ps -q) && docker rm $(docker ps -a -q) && docker rmi $(docker images -q)

Then we get the latest version of the docker-compose from GitHub:

wget https://github.com/eclipse/ditto/archive/refs/heads/master.zip
unzip master.zip

Unzip it, browse to the right directory, and start it:

cd master/deployment/docker
docker-compose up -d

Don’t forget to adjust the password:

openssl passwd -quiet
 Password: <enter password>
 Verifying - Password: <enter password>

Append the printed hash in the nginx.httpasswd (in the same folder as docker-compose.yml) file placing the username who shall receive this password in front like this:

ditto:A6BgmB8IEtPTs

Configuring Juniper SRX (100) as a DHCP server

Create a vlan interface:

set interfaces vlan unit 21 family inet address 192.168.x.2/24

Assign the vlan interface to a vlan :

set vlans vlan_name vlan-id 21
set vlans vlan_name l3-interface vlan.21

Assign the vlan to a physical interface:

set interfaces fe-0/0/0 unit 0 family ethernet-switching vlan members vlan_name

Assign the dhcp-local-server service to the vlan interface:

set system services dhcp-local-server group IoT interface vlan.21

Create the DHCP pool:

set access address-assignment pool Verhaeg_IoT family inet network 192.168.x.0/24
set access address-assignment pool Verhaeg_IoT family inet range r1 low 192.168.x.200
set access address-assignment pool Verhaeg_IoT family inet range r1 high 192.168.x.250
set access address-assignment pool Verhaeg_IoT family inet dhcp-attributes name-server 192.168.x.1
set access address-assignment pool Verhaeg_IoT family inet dhcp-attributes name-server 8.8.4.4
set access address-assignment pool Verhaeg_IoT family inet dhcp-attributes name-server 8.8.8.8
set access address-assignment pool Verhaeg_IoT family inet dhcp-attributes router 192.168.x.1

Don’t forget your security zone to allow dhcp traffic:

set security-zone x interfaces vlan.20 host-inbound-traffic system-services dhcp

Validate clients have received an IP address from the DHCP server:

root@ROU-02> show dhcp server binding

IP address        Session Id  Hardware address   Expires     State      Interface
192.168.x.201    2           b6:54:ca:26:51:ae  70785       BOUND      vlan.21
192.168.x.202    3           c8:34:8e:5f:a4:2d  85932       BOUND      vlan.21

Installing and configuring Mosquitto on Debian

Eclipse Mosquitto is an open source (EPL/EDL licensed) message broker that implements the MQTT protocol versions 5.0, 3.1.1 and 3.1. Mosquitto is lightweight and is suitable for use on all devices from low power single board computers to full servers. The MQTT protocol provides a lightweight method of carrying out messaging using a publish/subscribe model. This makes it suitable for Internet of Things messaging such as with low power sensors or mobile devices such as phones, embedded computers or microcontrollers. The Mosquitto project also provides a C library for implementing MQTT clients, and the very popular mosquitto_pub and mosquitto_sub command line MQTT clients. Mosquitto is part of the Eclipse Foundation, is an iot.eclipse.org project and is sponsored by cedalo.com.

https://mosquitto.org/

Installation

wget http://repo.mosquitto.org/debian/mosquitto-repo.gpg.key
sudo apt-key add mosquitto-repo.gpg.key
cd /etc/apt/sources.list.d/
sudo wget http://repo.mosquitto.org/debian/mosquitto-buster.list
apt-get update
apt-get install mosquitto

Configuration

Create file /etc/mosquitto/conf.d/listener.conf:

bind_address x.x.x.x

Create file /etc/mosquitto/conf.d/authorisation.conf:

listener 1883 x.x.x.x

Create a user and password:

mosquitto_passwd -c <password file> <username>
kill -HUP <process id of mosquitto>

Result in /var/log/mosquitto/mosquitto.log:

1636747458: New connection from x.x.x.x:59620 on port 1883.
1636747458: New client connected from x.x.x.x:59620 as y (p2, c1, k60, u'client').
1636747843: New connection from x.x.x.x:5709 on port 1883.
1636747843: New client connected from x.x.x.x:5709 as z (p2, c0, k60, u'client').

Validation